When exporting files from Photoshop, it is important to consider several options and settings to ensure that the exported file meets your requirements. Here are some key aspects to keep in mind when exporting:
1. File Format: Photoshop supports various file formats for export, including JPEG, PNG, GIF, TIFF, PDF, and more. Choose the format that best suits your needs. For web use, JPEG and PNG are commonly used formats.
2. Export Settings:
–JPEG: When exporting to JPEG, you can adjust the quality level to balance between file size and image quality. Higher quality settings result in larger file sizes.
– PNG: PNG is suitable for images with transparency. You can choose between PNG-8 (256 colours, smaller file size) and PNG-24 (millions of colours, larger file size).
– GIF: GIFs are used for animations or simple images with limited colours.
– TIFF: TIFF is a high-quality format often used for print or archival purposes. You can choose between uncompressed and compressed TIFF formats.
3. Image Size and Resolution: Specify the exported image’s dimensions (width and height). Set the resolution in pixels per inch (PPI) for print or pixels per centimetre (PPC) for web use.
4. Color Mode: Choose the appropriate colour mode for your export, such as RGB for web use or CMYK for print.
5. Background: Decide whether to include a background colour or transparency in your exported image, especially for formats like PNG that support transparency.
6. Metadata: Consider whether you want to include metadata (such as copyright information) in the exported file.
7. Save As vs. Export As: Photoshop offers different export options. “Save As” is used for saving Photoshop files in various formats, while “Export As” provides more specific options for web export, including image optimization settings.
8. Slicing and Optimization: For web design projects, you can use slicing tools in Photoshop to export specific elements or optimize images for faster web loading using features like Save for Web (legacy) or Export As (modern).
9. Batch Processing: If you have multiple images to export with similar settings, consider using Photoshop’s batch processing feature to save time and streamline the export process.
By considering these aspects and adjusting the export settings accordingly, you can effectively export images from Photoshop in the desired format, size, and quality for your specific use case.
Open your Photoshop document. Ensure all the layers you want to export are visible and arranged as desired.
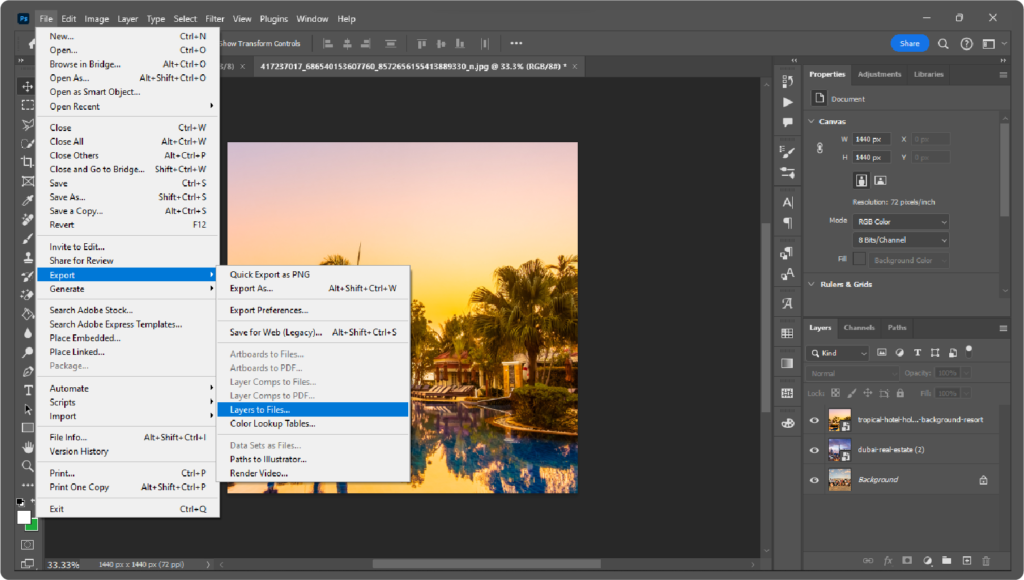
Go to File > Export > Layers to Files. (In older versions of Photoshop, you might find it under File > Scripts > Export Layers to Files.)
Choose a destination folder. Click “Browse” and select the folder to save your exported files.
Set the filename prefix (optional). This prefix will be added to the beginning of each exported file name. For example, if you type “Layer_” here, your files will be named “Layer_1.jpg”, “Layer_2.jpg”, and so on.
Choose your file format. You can choose from various formats like JPEG, PNG, PSD (Photoshop Document), and more. Each format has its advantages and uses.
JPEG: Good for photos with a lot of colours, but it compresses the image and can lose some quality.
PNG: Good for graphics with sharp edges and transparent backgrounds.
PSD: Preserves all layer information, but creates larger files.
Set additional options (optional). You can adjust settings like image quality (for JPEG), colour space, and trimming layers (removing transparent areas around them).
Click “Run.” Photoshop will export each visible layer as a separate file in the chosen format.
Create an action to automate the process. This method involves recording a series of steps and then replaying them on each layer you want to export. It can be more complex but allows for greater customization.
Make your layers visible and arrange them as desired.
Go to Window > Actions.
Click the “Create New Action” button (looks like a folder with a page-turning corner).
Name your action (e.g., “Export Layer”).
Click the “Record” button (red circle).
Perform the steps to export a single layer:
Go to File > Export > Save for Web (Legacy). (This option might be under a different menu in newer versions)
Choose your desired file format and quality settings.
Click “Save”.
Click the “Stop” button (black square) in the Actions panel.
With the layer still selected, play back the recorded action. (Click the play button next to your action name)
Repeat steps 8 and 9 for each layer you want to export.
Make sure you have enough disk space for all the exported files.
Choose the appropriate file format based on your needs.
Consider using a batch processing tool (if available in your Photoshop version) for even faster exporting of multiple layers.
In addition to its wide-ranging capabilities for image editing, Photoshop can import and manipulate video (.MP4) files using the Timeline Photoshop feature, To access Timeline Go to Windows > Timeline.
This means that users can utilize the same powerful tools and features found in Photoshop to edit or create video footage using existing layers, such as animating the position of elements or layers, adding filters and effects, and even adding text or graphics overlays. Also, you can make GIFs using Timeline in Photoshop.