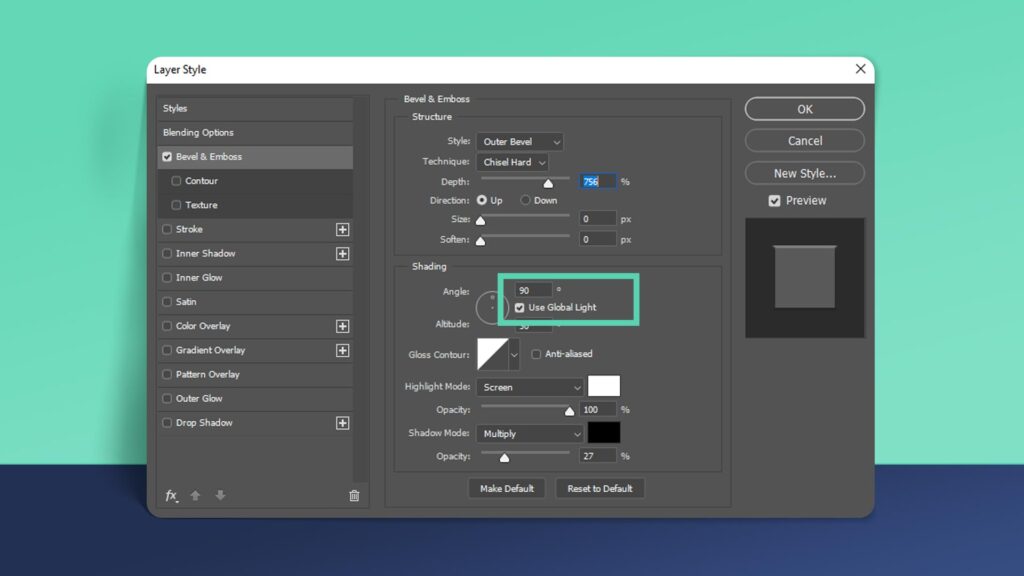
Global light option in Photoshop
Global Light Option in Photoshop in 2024
One of the simplest methods to undermine the appearance of realism in digital art is to use light and shadow effects when the light sources differ and various layers in Photoshop or objects are lighted and darkened from different angles.
When you use the Global Light option in effects like Bevel and Emboss, Drop Shadow, and others, you ensure their light sources all correlate, that highlights arrive from the same location, and that shadows are thrown in the same direction, even across numerous objects and layers.

After you’ve created your effects to use the Global Light, you can alter where that light comes from by going to Layer > Layer Style > Global Light and adjusting the Angle and Altitude of the Global Light. You can even witness all of your effects alter as they adjust to the shifting location of the Global Light if you click the Preview option.
Set a global lighting angle to project:
To apply a global lighting aspect to your video clip, do the following:
- Show Global Light Track from the Timeline panel’s menu.
Photoshop moves the Global Light track to the top of the track stack in the Timeline panel.
- Click the New Layer icon at the bottom of the Layers panel to add a new layer.
- By clicking the fx button at the bottom of the Layers panel, you may add a layer style.
Choose Bevel & Emboss, Inner Shadow, or Drop Shadow since they all include a Use Global Light option. When you select an option, Photoshop displays the Layer Style dialog box.
- Set the lighting angle and enable Use Global Light in the Layer Style dialog box.
Set the angle you desire for the first section of your project using the Angle slider (you can alternatively put a value into the area to its right), then select the Use Global Light option and click OK.
- Move the playhead to the beginning of your project in the Timeline panel.
Click the First Frame button or drag the playhead all the way to the left to place it. Click the stopwatch symbol to the left of the Global Light track’s name to add the keyframe; the keyframe automatically adopts the lighting angle you defined in the Layer Style dialog box.
You’re finished if you want the lighting angle to stay consistent throughout your project. Go to the following step if you wish to adjust the angle anyplace in the project.
- Adjust the lighting angle of the layer style you applied in Step 2 after moving the play head to where you want the light to change.
Double-click the name of the style you applied in Step 3 (for example, Bevel & Emboss) to return to the Layers panel. Change the Angle option in the resultant Layer Style dialog box, then click OK.
- Create a new keyframe at the location of your playhead.
To add a new keyframe, click the diamond on the Global Light track. The keyframe takes the new lighting angle you specified in the layer style and maintains it until the end of your project, or until you create a new global-lighting keyframe.
Apply the lighting effect filters
The Lighting Effects filter allows you to create a variety of lighting effects on RGB photos. You may also employ grayscale textures (called bump maps) to create 3D effects and store your own styles for use in other photographs.
Note: the Lighting Effects filter in Photoshop only works on 8-bit RGB photos. Lighting Effects need a compatible visual card.
Types of lighting effects
Lighting effects have three main types, which are as follows
- Point
- Infinite
- Spot
Point: Like a light bulb, it shines light in all directions from right above the picture.
Infinite: Like the sun, it casts light across a whole plane.
Spot: Casts an elliptical light beam. The preview window’s line sets the light direction and angle, while the handles define the ellipse’s boundaries.
Examples to use the global light option in Photoshop:
Here are a few examples of using a global light option in Photoshop.
Drop shadow:
- Make a fresh arrangement.
- Type the text you want into the “TEXT” text function.
- Enter “Drop Shadow” in the search box.
- Drop Shadow may be applied to a timeline layer or straight to the composition scene.
- Alternatively, go to the Effect menu and select Perspective > Drop Shadow.
- The text should now have a drop shadow behind it.
Applying a bevel and Emboss effect:
- Choose a layer to apply the bevel and emboss effect.
- Go to Layer > Layer Style > Bevel & Emboss.
- In the Layer Style dialog box, enable the “Use Global Light” option.
- Modify the Angle and Altitude settings to adjust the direction and angle of the bevel and emboss effect.
- Customize other settings like depth, highlight, and shadow as desired.
- Click OK to apply the bevel and emboss effect with the global light source.
Inner and outer glow:
- Select the layer you want to add a glow effect to.
- Go to Layer> Layer Style > Inner Glow or Outer Glow.
- In the Layer Style dialog box, check the “Use Global Light” option.
- Adjust the Angle setting to change the direction of the glow.
- Customize other settings like opacity, size, and color as needed.
- Click OK to apply the glow effect with the global light source.
Purpose of global light option:
Global light is a setting that applies to bevels and embosses, inner shadow, and drops shadow and is used to generate uniform lighting throughout all of your effects.
Related Topics