Have you ever experienced problems in editing, zooming, or even just saving a big file? You may be tired of Illustrator creating such a great file size. It can significantly slow down your workflow.
Saving huge amounts of data presents particular challenges because doing so frequently causes application crashes that result in the loss of all or some of the work. You can reduce these losses by using the Auto savior plugin’s autosaving feature, but it won’t completely stop time from being lost when you save a large file again. You will discover Several techniques in this article for reducing the source vector file.
If you are working with large files, it is very important to know how to reduce the file size for ease of use with a minimum delay. This article contains several ways of minimizing the source vector file.
This article explores several ways to reduce the size of vector-format files while retaining your artwork. If you use Adobe Illustrator, the size of the files you generate depends on how much content you add to them. The larger your files, the longer it takes Adobe Illustrator to process them.
Methods to reduce Illustrator file size
The article will show you how to work with vectors in Illustrator, many steps are taken to reduce illustrator file size without losing much detail, and even some tips can be used with less time involved. Use these methods according to the situations.
Reduce Image size in illustrator

If you are using high-quality Images in your design try to compress the image and ensure your image doesn’t lose the details obviously quality does matter in your design output. In this case, the best solution is to just link the image with the Creative Cloud Library, or if you are working offline save your Image in a specific folder and add it in illustrator but do not embed just keep it linked.
The size of your file will significantly decrease as a result. If you delete the image from the folder by mistake it will not be available in illustrator.
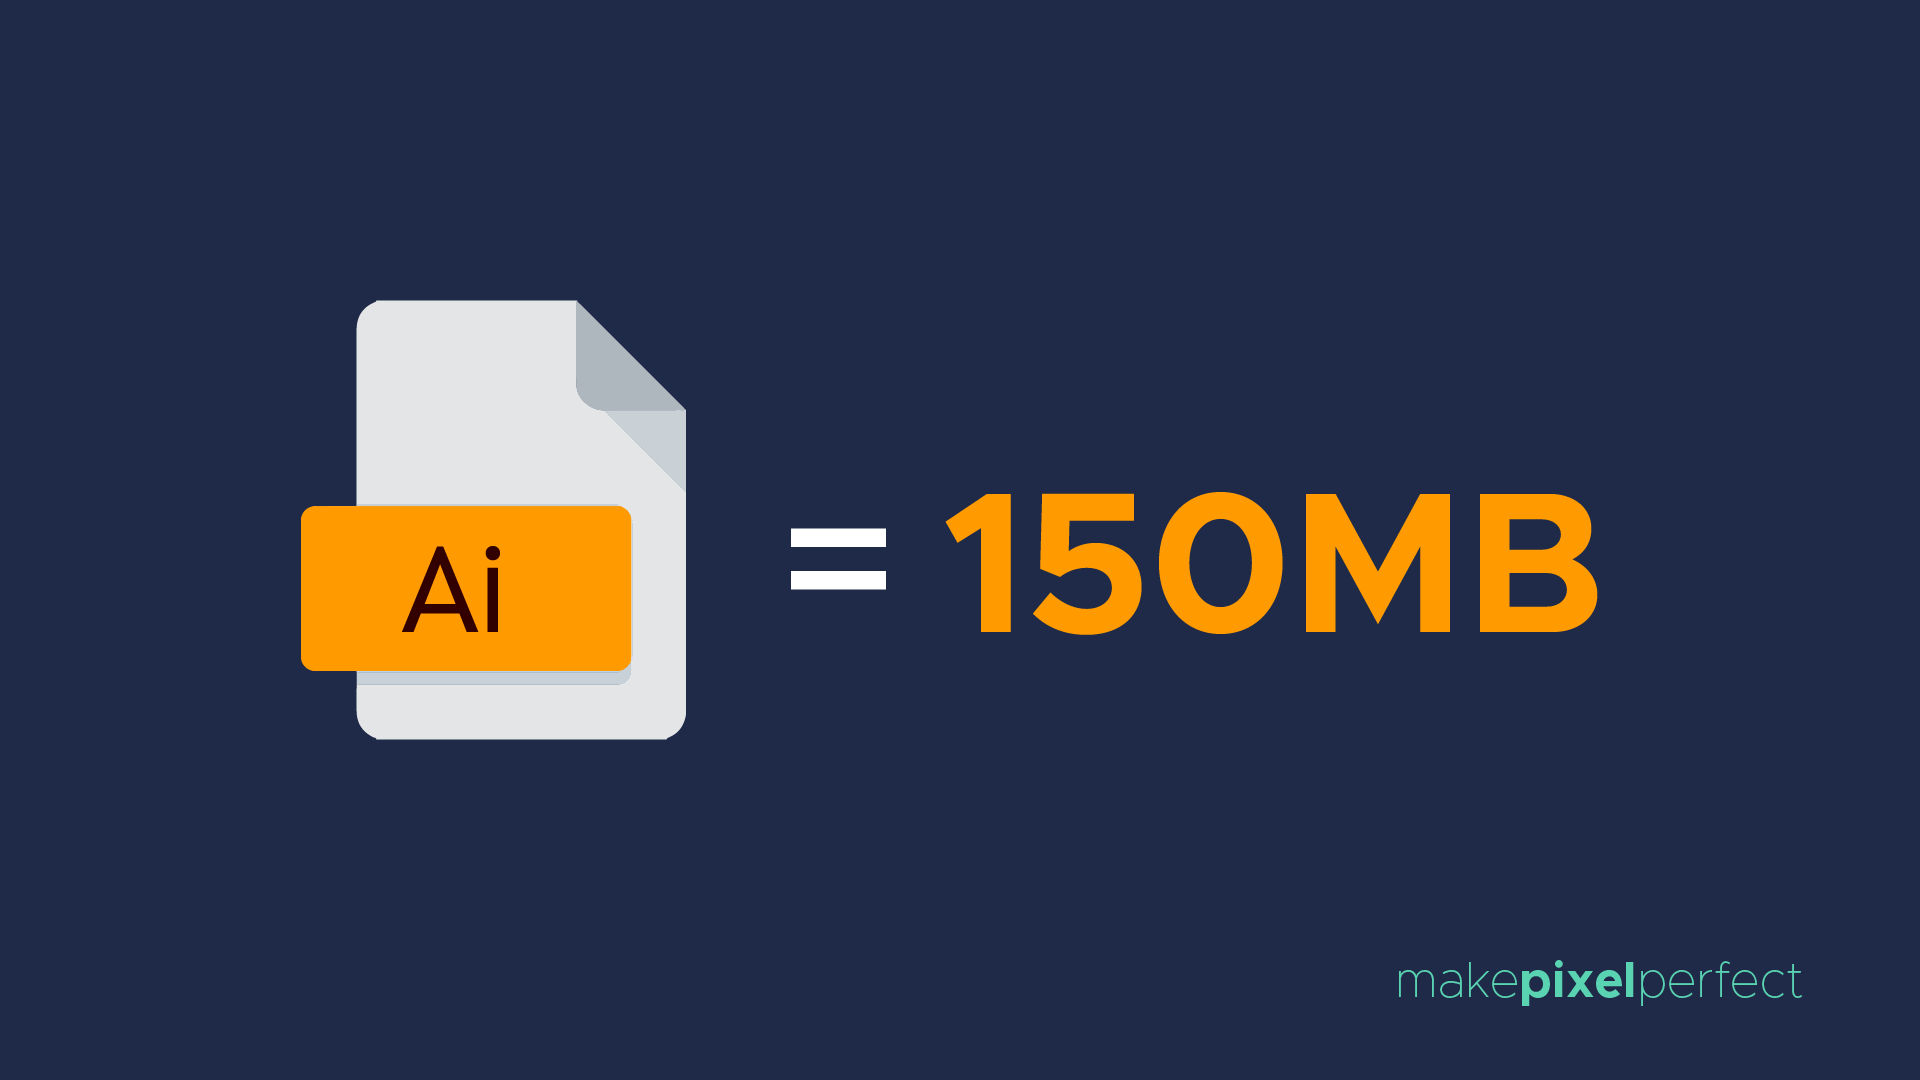
Vector artwork doesn’t make large files in illustrator. A raster Image creates a larger file when you save an Illustrator file (Ai). For example, if you are using 2-5 MBs of an Image in your design it can result in up to 70 MBs of Ai file. But if you don’t embed a raster image and keep it linked it will result in kilobytes (kbs) of illustrator file.
This method will reduce a great size of your editable files in illustrator.
Crop unnecessary areas of your image
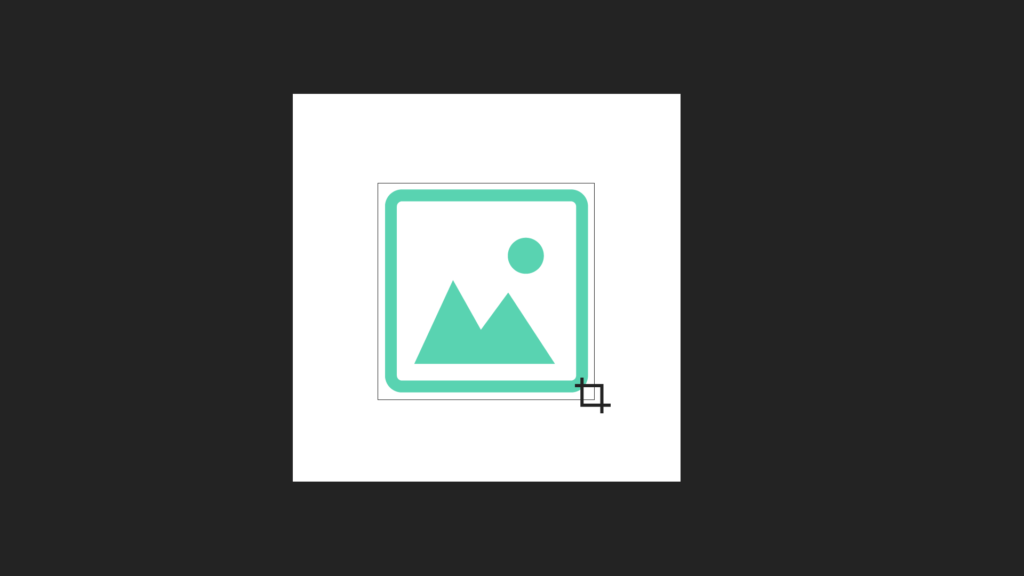
The greater size of an Image means a greater number of pixels it has and a greater the size of Image. Crop unneeded areas of your image will also help in reducing the file size and you can easily upload anywhere and share with anyone without facing any problems.
Remove unneeded images from the canvas this method will also help in reducing the size of your illustrator file.
Decrease the number of steps in the Blending object
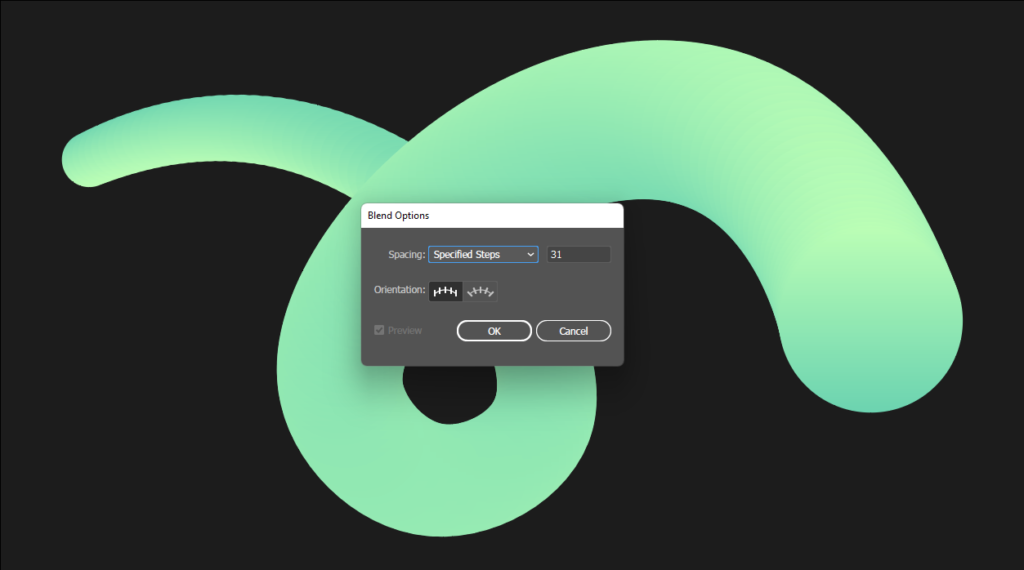
A blend can help you create the perfect combination of shapes in a more intuitive manner. Using more steps of the blend can result in great file size. Decrease the number of steps in the blending option in illustrator if it doesn’t cause a significant drop in the object’s quality.
To reduce the number of steps to select the blend, go to Object > Blend > Blend Options or just double-click on the Blend Tool icon in the Tools panel or you can just select the blend tool and press ENTER to pop up the Blend Options.
If a great number of blending steps affect your computer’s performance then decrease the number of steps until you finish the whole work and then restore the steps at the end from blending options when you are about to export your file.
Remove excess anchor points from the path
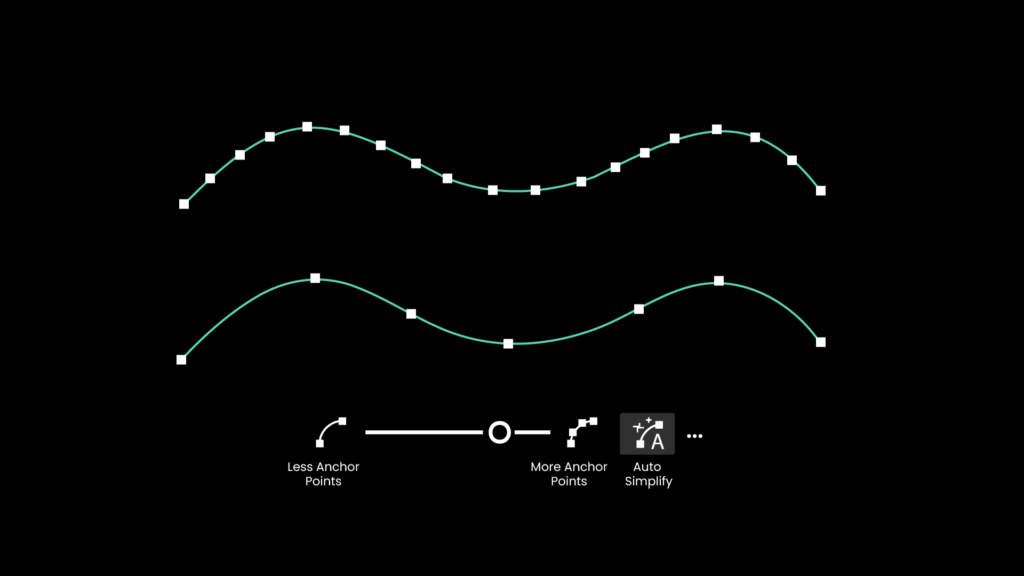
Anchor points maintain the shape of objects and are good to use for rough processing of the paths, such as reducing the number of points of vector textures when there is no need to maintain the shape of objects but can significantly change the shape of the image including items of detail that may be required.
The number of anchor points can be reduced to save memory and speed up work and you will get a smaller file size for ease of use and transfer. This can be done in the Simplify command in the Path panel Object > Path > Simplify. Or select the path or object and click on it and Simplify. Move the slider to left for less anchor points and move to right for more.
In some cases, the Smooth tool is perfect to reduce anchor points. This tool reduces the points and makes your path smoother that looks more perfect.
Reduce Raster Effect Resolution
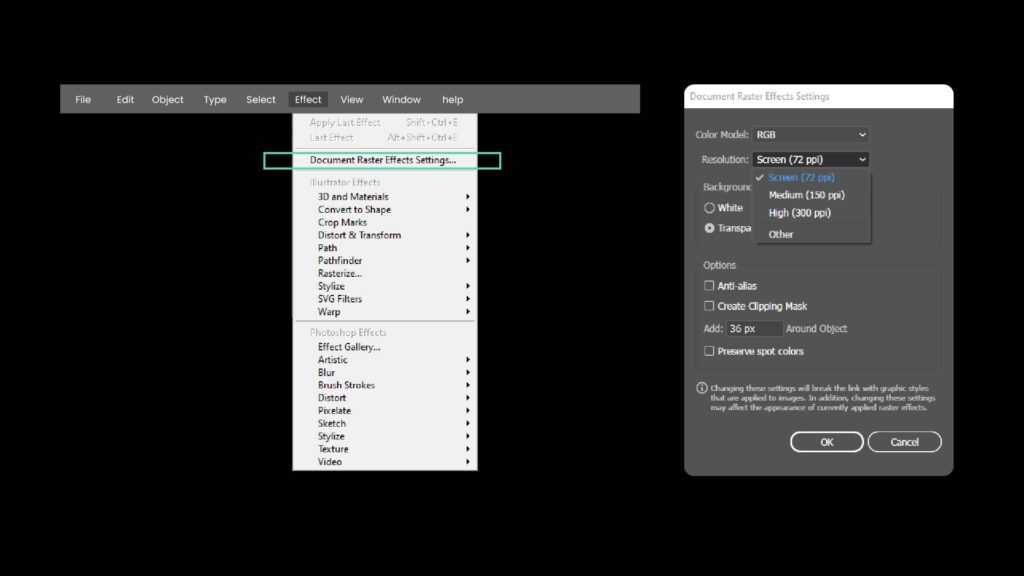
When working with a large document that contains many raster effects, it is sometimes desirable to reduce the resolution at which these effects are applied to the actual text and images in the document.
You can do this by adjusting the option in the Document Raster Effects Settings dialog box. Reduce the resolution of all raster effect settings. To reduce the resolution of all raster effects, Go to Effect > Document Raster Effects Settings command and set a low value for the resolution in the dialog box.
Save files in compressed PDF
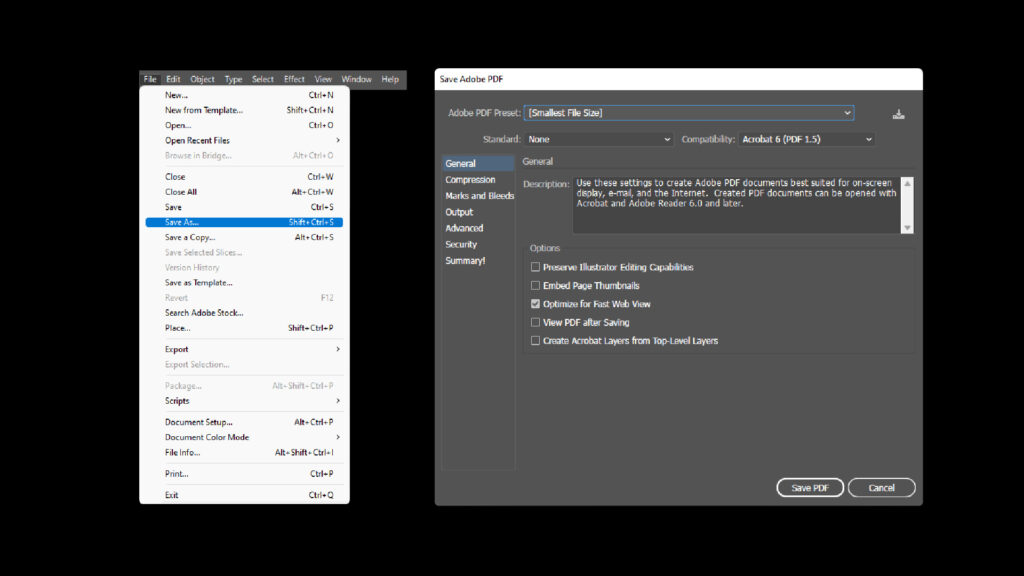
Want your artwork to take less space on your drive and can easily send through email?
Save the Illustrator file in compressed PDF format. Compress enough so it can be edited again and sent to clients, partners, and vendors so they can review the design directly from their email inboxes. Compressed PDF files are great for sending to coworkers or subcontractors. PDF files are completely editable when exported from illustrator. Don’t compress too much so it doesn’t convert your vector artwork into raster images.
How to save a Compressed PDF keeping it editable in illustrator?
Finalize your artwork then go to File > Save As > Adobe PDF (*.PDF). Save As window will open this will allow you how much compression you want to apply. It also allows you to save it in other PDF versions with compatibility. Select [Smallest File Size] and the Save PDF.
Follow these methods to reduce your editable files and easily send files across the internet.
Related Posts
Some Pantone colors may no longer be available due to changes in Panton’s licensing with Adobe
Some Pantone colors may no longer be available due to…
Learn to use star tool in illustrator and create awesome things
Star tool in Illustrator seems straightforward We could assume that…
How to open Photoshop files in illustrator?
How to open Photoshop files in illustrator? To open a…